Advanced Usage
Color Palette
ImageOptimize extracts a color palette composed of the 5 most dominant colors used by an image that you can access from your templates:
    {% set optimizedImages = entry.myAssetField.one().optimizedImagesField %}
    {% for color in optimizedImages.colorPalette %}
        <div style="background-color: {{ color }}">
        </div>
    {% endfor %}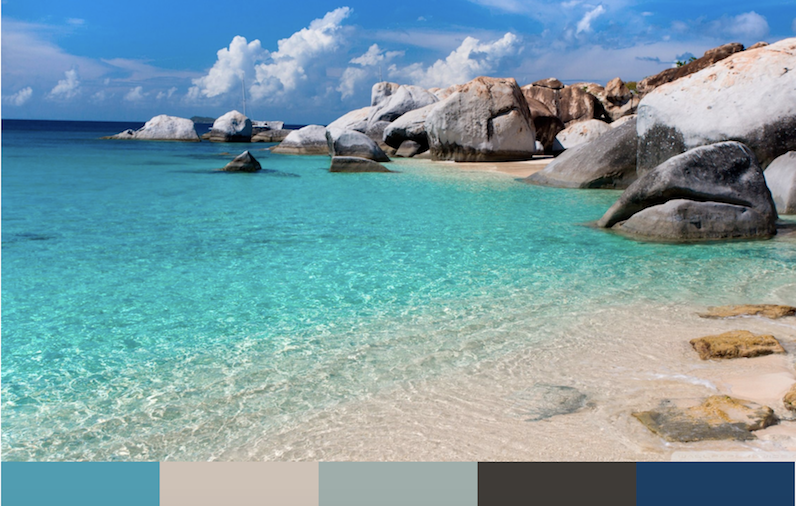
Dominant Color Palette
These colors are sorted by color dominance, and can be used to style other HTML elements with complimentary colors.
If you need these colors in RGB format for things like CSS gradients, you can do that with .colorPaletteRgb:
    {% set optimizedImages = entry.myAssetField.one().optimizedImagesField %}
    {% for color in optimizedImages.colorPaletteRgb %}
        <div style="background-color: rgb({{ color.r }}, {{ color.g }}, {{ color.b }}, )">
        </div>
    {% endfor %}
Lightness
ImageOptimize will also calculate the overall lightness of an image for you. It does this by doing a weighted average of the dominant color palette. You can access this from your templates:
    {% set optimizedImages = entry.myAssetField.one().optimizedImagesField %}
    {% if optimizedImages.lightness | length %}
        {% set lightnessPercentage = optimizedImages.lightness %}
    {% endif %}
The lightness field is a percentage from 0 (black) to 100 (white). You can use this to decide what color text to use to overlay the image, for example.
Iterating Through URLs
Should you want to iterate through the URLs individually, you can do that via:
    {% set optimizedImages = entry.myAssetField.one().optimizedImagesField %}
    {% for url in optimizedImages.optimizedImageUrls %}
        {{ url }}
    {% endfor %}
    {% for url in optimizedImages.optimizedWebPImageUrls %}
        {{ url }}
    {% endfor %}
Or to get the width as well as the url, you can do:
    {% set optimizedImages = entry.myAssetField.one().optimizedImagesField %}
    {% for width,url in optimizedImages.optimizedImageUrls %}
        {{ width ~ ' - ' ~ url }}
    {% endfor %}
    {% for width,url in optimizedImages.optimizedWebPImageUrls %}
        {{ width ~ ' - ' ~ url }}
    {% endfor %}
Image Variant Height
Should you want to access the height of a given variant, you can do that via:
    {% set optimizedImages = entry.myAssetField.one().optimizedImagesField %}
    {{ optimizedImages.variantHeights[VARIANT_WIDTH] }}
...where VARIANT_WIDTH is the width of the image variant.
Or to iterate through the width as well as the height, you can do:
    {% set optimizedImages = entry.myAssetField.one().optimizedImagesField %}
    {% for width,height in optimizedImages.variantHeights %}
        {{ width ~ ' - ' ~ height }}
    {% endfor %}
Arbitrary placeholder SVGs
Should you need to create an arbitrary placeholder SVG for lazy loading of images, you can do that via:
{% set placeholderBox = craft.imageOptimize.placeholderBox(100, 100, '#CCC') %}
<img src="{{ placeholderBox }}" />
The method signature is placeholderBox(WIDTH, HEIGHT, COLOR).
Miscellaneous
The maxSrcsetWidth() method allows you to work around issues with <img srcset> returning sizes larger than are available as per the Unexpected Image Sizes article. It returns the width of the largest Optimized Image Variant:
    {% set optimizedImages = entry.myAssetField.one().optimizedImagesField %}
    <img src="{{ optimizedImages.src() }}"
         srcset="{{ optimizedImages.srcset() }}"
         sizes="100vw"
         width="{{ optimizedImages.maxSrcsetWidth() }}"
         height="auto" />
Async Queue plugin
Normally ImageOptimize will regenerate image variants if you change an OptimizedImages field, save the ImageOptimize preferences, or save an Assets Volume that contains an OptimizedImages field, to ensure that all of your image variants are in sync.
Re-saving many images at a time can be intensive, and on certain setups may require tweaking the php.ini setting max_execution_time. An alternative for better handling of any lengthy Craft CMS task is the Async Queue plugin.
All you need to do is install the plugin, and any queue jobs in Craft CMS 3 will now run entirely in the background via the CLI php, which isn’t subject to the same restrictions that the web php is.
Also read the article Robust queue job handling in CraftCMS for other possible solutions.
GraphQL via Craft CMS 3.3
ImageOptimize has built-in support for accessing the OptimizedImages field via GraphQL using Craft CMS 3.3’s GraphQL support.
You can access all of the primary OptimizedImages field methods:
{
  entries(section: "homepage", limit:1) {
    ...on homepage_homepage_Entry {
      title
      uri
      someAsset {
        ...on blog_Asset {
          optimizedImages {
            src,
            srcset,
            srcWebp,
            srcsetWebp,
            maxSrcsetWidth,
            placeholderImage,
            placeholderBox,
            placeholderSilhouette
          }
        }
      }
    }
  }
}
...as well as all of the OptimizedImages field properties:
{
  entries(section: "homepage", limit:1) {
    ...on homepage_homepage_Entry {
      title
      uri
      someAsset {
        ...on blog_Asset {
          optimizedImages {
            srcsetMinWidth(width: 600),
            srcsetMinWidthWebp(width: 600),
            srcsetMaxWidth(width: 1200),
            srcsetMaxWidthWebp(width: 1200),
            optimizedImageUrls,
            optimizedWebPImageUrls,
            variantSourceWidths,
            originalImageWidth,
            originalImageHeight
            placeholder,
            placeholderSvg,
            colorPalette,
            colorPaletteRgb,
            placeholderWidth,
            placeholderHeight
          }
        }
      }
    }
  }
}
GraphQL via CraftQL Plugin
ImageOptimize has built-in support for accessing the OptimizedImages field via GraphQL using the CraftQL plugin.
You can access all of the primary OptimizedImages field methods:
{
  entries(section:[homepage], limit:1) {
    ...on Homepage {
      title
      url
      someAsset {
        ...on AssetsVolume {
        title
        optimizedImages {
          ...on OptimizedImagesData {
            src,
            srcset,
            srcWebp,
            srcsetWebp,
            maxSrcsetWidth,
            placeholderImage,
            placeholderBox,
            placeholderSilhouette
            }
          }
        }
      }
    }
  }
}
...as well as all of the OptimizedImages field properties:
  entries(section:[homepage], limit:1) {
    ...on Homepage {
      title
      url
      someAsset {
        ...on AssetsVolume {
        title
        optimizedImages {
          ...on OptimizedImagesData {
            srcsetMinWidth(width: 600),
            srcsetMinWidthWebp(width: 600),
            srcsetMaxWidth(width: 1200),
            srcsetMaxWidthWebp(width: 1200),
            optimizedImageUrls,
            optimizedWebPImageUrls,
            variantSourceWidths,
            originalImageWidth,
            originalImageHeight
            placeholder,
            placeholderSvg,
            colorPalette,
            placeholderWidth,
            placeholderHeight
            }
          }
        }
      }
    }
  }
}
Writing your own Image Transform class
ImageOptimize was written in an extensible way so that you can write your own Image Transform method to work with any service you like. It comes with built-in support for Craft, imgix, Thumbor, and Sharp JS but you can add your own by writing a class that extends the ImageTransform abstract class:
<?php

namespace vendor\package;

use nystudio107\imageoptimize\imagetransforms\ImageTransform;

class MyImageTransform extends ImageTransform
{
    // Your method overrides go here
}
The ImageTransform abstract class extends craft\base\SavableComponent to allow it to display & save settings, and implements nystudio107\imageoptimize\imagetransforms\ImageTransformInterface to handle the image transforms. See those classes, or the implemented ImageTransform classes in nystudio107\imageoptimize\imagetransforms for details.
Once you have your ImageTransform class, you need to let ImageOptimize know about it.
If your ImageTransform is a separate stand-alone Composer package, you can simply composer require your package, and add the class to your config/image-optimize.php multi-environment config file:
use vendor\package\MyImageTransform;

...

    // The default Image Transform type classes
    'defaultImageTransformTypes' => [
        MyImageTransform::class,
    ],
No module or plugin bootstrapping code needed to get it working. For an example of how this works, check out craft-imageoptimize-imgix & craft-imageoptimize-thumbor & craft-imageoptimize-sharp.
To wrap your ImageTransform into a plugin or module, simply listen for the EVENT_REGISTER_IMAGE_TRANSFORM_TYPES event to add your ImageTransform to the types that ImageOptimize knows about.
use vendor\package\imagetransforms\MyImageTransform;

use nystudio107\imageoptimize\services\Optimize;
use craft\events\RegisterComponentTypesEvent;
use yii\base\Event;

Event::on(Optimize::class,
     Optimize::EVENT_REGISTER_IMAGE_TRANSFORM_TYPES,
     function(RegisterComponentTypesEvent $event) {
         $event->types[] = MyImageTransform::class;
     }
);
Although ImageOptimize itself uses the same mechanisms internally for ImageTranform implementations, this allows you to update & maintain an ImageTransform entirely independent of ImageOptimize.
This technique is discussed in depth in the Writing Craft Plugins with Extensible Components article.
Brought to you by nystudio107