Using Instant Analytics
Simple Page Tracking
Once you’ve entered your Google Analytics Tracking ID, Instant Analytics will automatically send PageViews to Google Analytics if you have Auto Send PageViews on (which it defaults to). There is no step 2.
To control which pages Instant Analytics sends PageViews on, set Auto Send PageViews to off. Then you just need to add a call to {% hook 'iaSendPageView' %} to your frontend templates to send PageView tracking to Google Analytics. We recommend that you do this in a block at the bottom of your layout.twig template that other templates extend, right before the </body> tag, like this:
    {% block analytics %}
        {% hook 'iaSendPageView' %}
    {% endblock %}
That’s it! Once you have added this hook, Instant Analytics will start sending PageViews to Google Analytics. It does not send any Google Analytics data if:
- You have not entered a valid Google Analytics Tracking ID:
- You are viewing templates in Live Preview
- The request is a CP or Console request
- If you have
sendAnalyticsDataset to false in theconfig.phpfile
By default, the "title" used for your pages is the current template path; if you have SEOmatic installed, Instant Analytics will automatically grab the current page title from it.
Instant Analytics will also automatically parse and set any UTM query string parameters such as utm_campaign, utm_source, utm_medium, and utm_content in the analytics object.
Advanced Page Tracking
This is where the fun begins. Instant Analytics injects an instantAnalytics object into your templates, the same way that Craft injects an entry object or Craft Commerce injects a product object. This is the actual Analytics object that the {% hook 'iaSendPageView' %} will send to Google Analytics.
You can manipulate this object as you see fit, adding data to be sent to Google Analytics along with your PageView.
For example, let’s say that you want to add an Affiliation:
{% do instantAnalytics.setAffiliation("Brads for Men") %}
Or perhaps for a particular page, you want to change the the Tracking ID used by Google Analytics:
{% do instantAnalytics.setTrackingId("UA-26293624-12") %}
Or do them both at the same time:
{% do instantAnalytics.setAffiliation("Brads for Men").setTrackingId("UA-26293624-12") %}
You can add or change any property defined in the Google Analytics Measurement Protocol library for PHP that Instant Analytics uses.
By default, the injected instantAnalytics object is filled in with the following info:
instantAnalytics.setProtocolVersion('1')instantAnalytics.setTrackingId(YOUR_TRACKING_ID)instantAnalytics.setIpOverride($_SERVER['REMOTE_ADDR'])instantAnalytics.setUserAgentOverride($_SERVER['HTTP_USER_AGENT'])instantAnalytics.setDocumentReferrer($_SERVER['HTTP_REFERER'])instantAnalytics.setClientId(CID)instantAnalytics.setDocumentPath(craft.request.url)instantAnalytics.setDocumentTitle(TEMPLATE_PATH)
If the SEOmatic plugin is installed, then it is used to set the title:
instantAnalytics.setDocumentTitle(seomaticMeta.seoTitle)
If there is a gclid cookie (used for Google AdWords tracking), this will also be set:
instantAnalytics.setGoogleAdwordsId(GCLID)
Craft Commerce Tracking with Google Enhanced Ecommerce
If you are using Craft Commerce, Instant Analytics will recognize this, and automatically send Google Enhanced Ecommerce data for the following actions:
- Add to Cart - When someone adds an item from your Craft Commerce store to their cart. This will include data for the Product or Variant that was added to the cart.
- Remove from Cart - When someone removes an item from your Craft Commerce store cart (requires Craft Commerce 1.2.x or later). This will include data for the Product or Variant that was removed from the cart.
- Purchase - When someone completes a purchase in your Craft Commerce store. This will include all of the LineItems that were added to the cart, as well as the Order Reference, Revenue, Tax, Shipping, and Coupon Code used (if any).
You simply need to enable Enhanced Ecommerce in your Google Analytics Admin area for your website’s property:
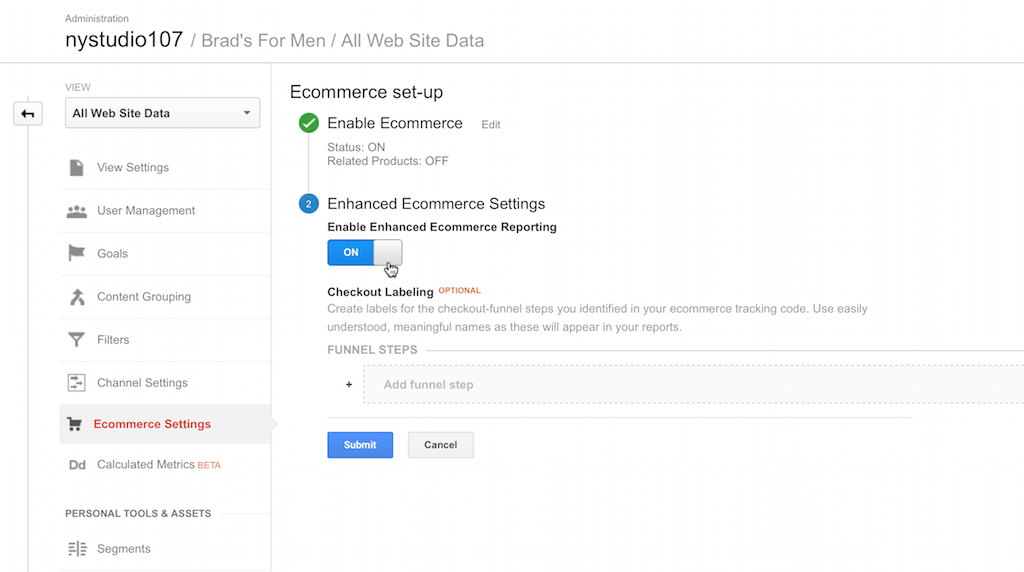
That’s it! It’ll just work. In addition to the basic automatic tracking that Instant Analytics does, you can use the instantAnalytics object to send additional data to Google Analytics Enhanced Ecommerce:
{% do instantAnalytics.addCommerceProductImpression(PRODUCT_VARIANT, INDEX, LIST_NAME, LIST_INDEX) %}- This will add an impression for a given Craft CommerceProductorVariant(you can pass in either inPRODUCT_VARIANT).INDEXmust be a number between 1-200, and is the position in the list of products where this product appears. This should be used on product listing pages that show a number of products, to indicate that the user has been shown a particular product.LIST_NAMEandLIST_INDEXare optional; they let you set the product list name, and the index of that list, which is a number from 1-200, and should be unique to the list.LIST_NAMEdefaults todefaultandLIST_INDEXdefaults to1if not specified.{% do instantAnalytics.addCommerceProductDetailView(PRODUCT_VARIANT) %}- This will add a product detail view for a given Craft CommerceProductorVariant(you can pass in either inPRODUCT_VARIANT). This should be used when the user is shown the detail view of a product.{% do instantAnalytics.addCommerceCheckoutStep(CART, STEP, OPTION) %}- This will add a checkout step for a given Craft CommerceCART(obtained viacraft.commerce.cart). TheSTEPparameter lets you specify which step in the checkout process you are on, and theOPTIONparameter is optional information you can associate with this checkout step, for example:Shipping InfoorVISA.
You can set up names for each of the Checkout Steps in your Google Analytics Admin area for your website’s property:

Note theSTEP supplied to Instant Analytics must be in number form - to match the number of the step you have created in the Google Analytics Admin area. So to record a customer reaching your checkout’s shipping step, and the type of shipping they have chosen, you could do this:
{% do instantAnalytics.addCommerceCheckoutStep(cart, 2, "Standard Post") %}
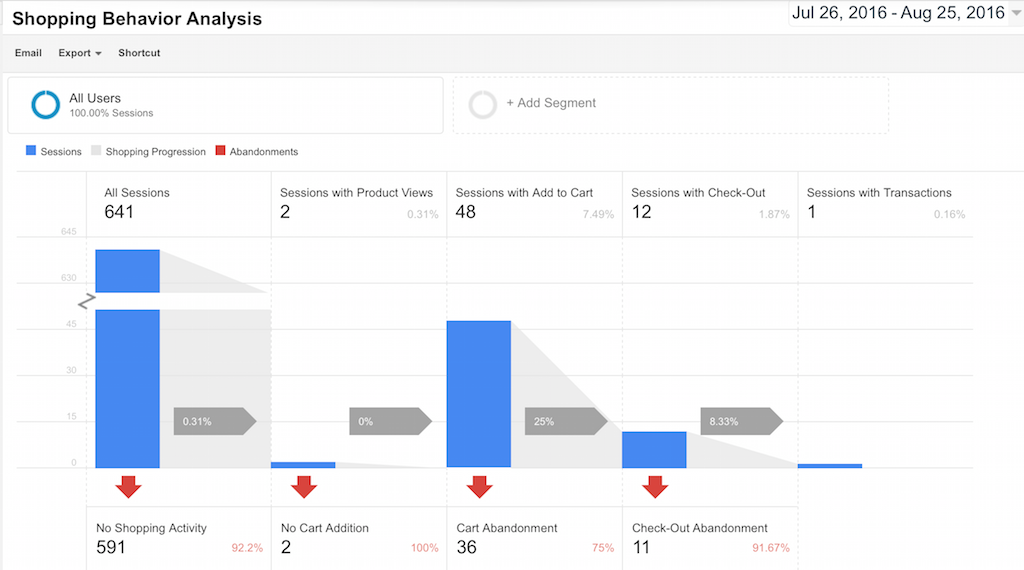
Once you are using these tags in your templates, Google Analytics Enhanced Ecommerce will be able to provide you with extended analysis of things like at what step in your Checkout process people abandon their carts, which products people are looking at detailed views of, etc.:
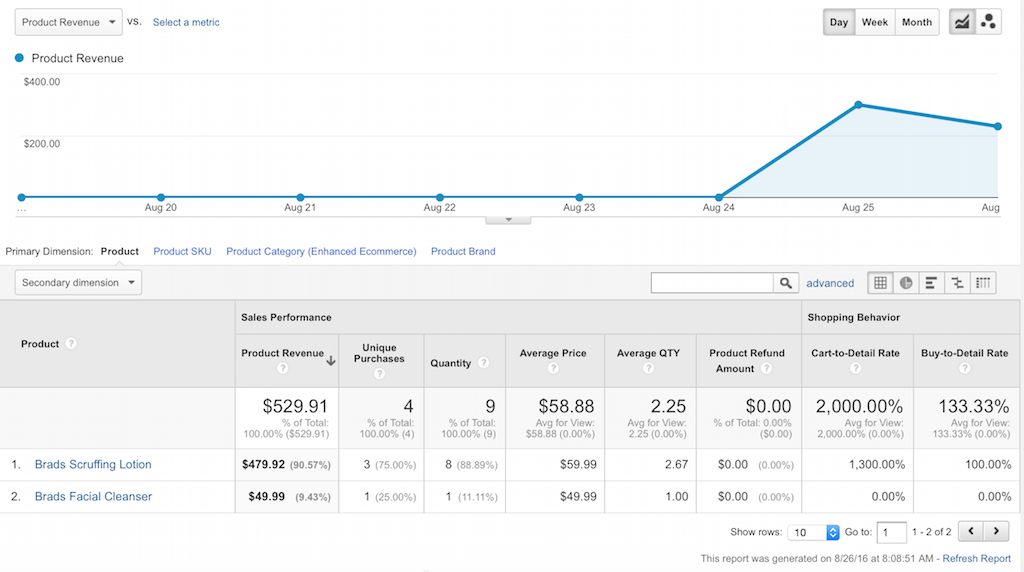
In addition to the expected sales data:
Sending Events
You can obtain an Analytics object preloaded to send events to Google Analytics via either:
    {% set myAnalytics = eventAnalytics(CATEGORY, ACTION, LABEL, VALUE) %}
    -OR-
    {% set myAnalytics = craft.instantAnalytics.eventAnalytics(CATEGORY, ACTION, LABEL, VALUE) %}
What CATEGORY, ACTION, LABEL, and VALUE are is completely up to you (VALUE must be an integer, though); you can provide whatever data makes sense for your application, and view it in Google Analytics. See Event Tracking for more information.
By default, the injected instantAnalytics object is filled in with the following info:
myAnalytics.setProtocolVersion('1')myAnalytics.setTrackingId(YOUR_TRACKING_ID)myAnalytics.setIpOverride($_SERVER['REMOTE_ADDR'])myAnalytics.setUserAgentOverride($_SERVER['HTTP_USER_AGENT'])myAnalytics.setDocumentHostName($_SERVER['SERVER_NAME'])myAnalytics.setDocumentReferrer($_SERVER['HTTP_REFERER'])myAnalytics.setClientId(CID)myAnalytics.setEventCategory(CATEGORY)myAnalytics.setEventAction(ACTION)myAnalytics.setEventLabel(LABEL)myAnalytics.setEventValue(VALUE)
If there is a gclid cookie (used for Google AdWords tracking), this will also be set:
myAnalytics.setGoogleAdwordsId(GCLID)
You manipulate the myAnalytics object as you see fit, adding or changing any property defined in the Google Analytics Measurement Protocol library for PHP that Instant Analytics uses.
However, the event will not be sent to Google Analytics until you tell it to via:
{% do myAnalytics.sendEvent() %}
A complete example might be:
    {% set myAnalytics = eventAnalytics('UX', 'View Ad', entry.someAdName, entry.someImpressions) %}
    {% do myAnalytics.setAffiliation(entry.someAffiliation).sendEvent() %}
Tracking Assets/Resources
Instant Analytics lets you track assets/resources that you can’t normally track, by providing a tracking URL that you use in your frontend templates.
You can track as PageViews via either:
    {{ pageViewTrackingUrl(URL, TITLE) }}
    -OR-
    {{ craft.instantAnalytics.pageViewTrackingUrl(URL, TITLE) }}
Or you can track as Events via either:
    {{ eventTrackingUrl(URL, CATEGORY, ACTION, LABEL, VALUE) }}
    -OR-
    {{ craft.instantAnalytics.eventTrackingUrl(URL, CATEGORY, ACTION, LABEL, VALUE) }}
These can be wrapped around any URL, so you could wrap your tracking URL around an image, a PDF, or an externally linked file... Whatever.
What happens when the link is clicked on is Instant Analytics sends the tracking PageView or Event to Google Analytics, and then the original URL is seamlessly accessed.
The URL that Instant Analytics generates will look like this:
    http://yoursite.com/instantAnalytics/pageViewTrack/FILENAME.EXT?url=XXX&title=AAA
    -OR-
    http://yoursite.com/instantAnalytics/eventTrack/FILENAME.EXT?url=XXX&eventCategory=AAA&eventAction=BBB&eventLabel=CCC&eventValue=DDD
It’s done this way so that the URL can be directly used in RSS feeds for the media object URLs, which require that the filename is in the URL path.
Custom Tracking via Twig or Plugin
If your needs are more specialized, you can build arbitrary Google Analytics data packets with Instant Analytics. To get an Analytics object do the following:
Twig:
{% set myAnalytics = craft.instantAnalytics.analytics() %}
PHP via Plugin:
$myAnalytics = InstantAnalytics::$plugin->ia->analytics();
In either case, you will be returned an Analytics object that is initialized with the following settings for you:
    $myAnalytics->setProtocolVersion('1')
        ->setTrackingId(YOUR_TRACKING_ID)
        ->setIpOverride($_SERVER['REMOTE_ADDR'])
        ->setAsyncRequest(false)
        ->setClientId(CID);
        ->setGoogleAdwordsId(GCLID);
You are then free to change any of the parameters as you see fit via the Google Analytics Measurement Protocol library for PHP
Here’s a simple example where we send a PageView for a specific page (after adding an Affiliation):
Twig:
    {% set myAnalytics = craft.instantAnalytics.analytics() %}
    {% do myAnalytics.setDocumentPath('/some/page').setAffiliation('nystudio107').sendPageview() %}
PHP via Plugin:
    $myAnalytics = InstantAnalytics::$plugin->ia->analytics();
    $myAnalytics->setDocumentPath('/some/page')
        ->setAffiliation('nystudio107')
        ->sendPageview();
The sky’s the limit in either case, you can do anything from simple PageViews to complicated Google Enhanced eCommerce analytics tracking.
Brought to you by nystudio107