Andrew Welch
Published , updated · 5 min read · RSS Feed
Please consider 🎗 sponsoring me 🎗 to keep writing articles like this.
So You Wanna Make a Craft 3 Plugin?
Whether you’re porting an existing plugin from Craft CMS 2.x or writing your first plugin for Craft 3, this article will show you how to do it

This article will show you how to write a plugin for Craft CMS 3.x. I’m not going to show you how to write a specific plugin, but rather focus on the process and methodologies that you’ll use.
Check out the A Craft CMS Plugin Local Development Environment article for details on how to set up a local development environment for plugin development.
As the Craft 3 Beta Executive Summary article notes, now is the perfect time to start working on a Craft 3 plugin if you’d like it to be ready by the time Craft 3 comes out of beta, and is released.
The time to start working on Craft 3 plugins is now
Even if you’re a frontend developer who has never ventured into “backend development”, I’m here to tell you that there’s no reason you can’t do it.
Programming is just programming. The languages and frameworks will come and go; the underlying skills you develop are what matter.
Let’s say you go on vacation to a foreign country, and want to rent a car to drive around. You wouldn’t say to yourself “I can’t drive here, everything is totally different!”
No. Because you still know how to drive. The street names and local customs you can learn as you go, the fact that you know how to drive is what matters.
So it is with development. Don’t limit yourself by saying “I don’t do XXX” because you absolutely can do it. There will be a decent bit to learn, but then again, there always will be.
Knowing how to learn is probably the single most important skill in being a developer, because the tech du jour changes constantly.
Alright, so we’ve had our little pep talk, and we’re ready to go! But what exactly is a plugin, and why would I want to write one?
Link What is a plugin?
A plugin is just code that extends an existing system. Developers can’t anticipate every single scenario, so they create an architecture for extending the functionality of their product.
Sometimes they are called “plugins”, sometimes they are called “modules”. Whatever you call them, and whatever language they are written in, they exist to give you a way to extend an existing system. In our case, the plugins we’re going to make for Craft 3 are written in PHP.
Fun fact: PHP originally stood for “Personal Home Page”
At it’s core, your plugin is just code you write, but it needs to be wrapped up in the scaffolding that defines the API created by the developers of the system that you’re extending.
This is probably the most intimidating part of writing a plugin, because you’re essentially having to learn whatever boutique API you’re given. Some APIs are good, some are not… but they are all your entre into adding the functionality you want.
This is probably the least interesting part of developing a plugin, as the scaffolding is just boilerplate.
Fortunately, these days there are scaffolding tools for just about everything you might want to build, which takes the drudgery out of doing it. They create the skeleton scaffolding, you drop your own code into it. It lets you hit the ground running.
For Craft CMS, I created a website called pluginfactory.io that will create all of this Craft CMS plugin scaffolding for you, for either the 2.5.x or 3.0.x APIs. The website is powered by a Yeoman generator called generator-craftplugin that you can install locally to use from the command line as well, if that’s your thing.
But first, let’s tool up.
Link Tooling makes everything easier
You know those cheesy scenes in action movies where the hero gears up with a ridiculous amount of weaponry before going to wage some ridiculously impossible battle?

Well, we’re going to do the same thing before we start working on any PHP development.
First, you’re going to need some kind of local development environment. I prefer using a real VM as described in the Local Development with Vagrant / Homestead article, but I know some very smart people who use other solutions like Valet or MAMP.
I like using Homestead because it comes with all the tools I’m going to use pre-installed, like Composer for installing PHP packages (which you will need for Craft 3), Blackfire for performance testing, XDebug for debugging, as well as an Node, and an Nginx server environment that replicates production closely.
However, use whatever works for you.
PhpStorm is not free; but it is infinitely worth it if you do any amount of PHP development.
Remember, there is a difference between the price of something, and the cost. In this case, if you do any amount of PHP development, the price of PhpStorm is tiny compared to the cost of not using it. It’s that good.
If you don’t believe me, spend a few minutes watching the (free) Be Awesome in PhpStorm LaraCasts. There are a lot of useful setup videos early on, but make sure you watch videos 06→12 where you will really learn how PhpStorm saves you the most precious resource you have: time.

PhpStorm auto-completion
One absolutely amazing thing you can do in PhpStorm is get full auto-completion of the entire craft. APIs in your Twig templates, too! To do make the magic happen, install the Symfony plugin, then Go to Preferences → Languages & Frameworks → PHP → Symfony and check Enable Plugin for this Project.
Then all you need to do is put this inspection hint at the top of your Twig templates:
{# @var craft \craft\web\twig\variables\CraftVariable #}…and just like that, you get the same magic auto-completion of in your Twig templates that you have in your PHP code. And since the entire Craft application is available in our Twig templates now, this makes writing Twig code that uses the Craft app APIs so much nicer.
For an even sweeter way to do it, check out the Auto-Complete Craft CMS 3 APIs in Twig with PhpStorm article!
And that doesn’t even get into the ability of PhpStorm to take advantage of Yii2 inspections, set breakpoints, and so on. Remember, there are some really good editors out there in Sublime, VS Code, and Atom… but PhpStorm is an Integrated Development Environment (IDE), not just an editor.
I used to think that these people who were writing beautiful PHP code were just PHP-gods, but once I started using PhpStorm, I realized they just had really awesome tooling.
I would also highly recommend installing the Craft Code Style & Craft Inspections from Pixel & Tonic. Also take the time to install the Php Inspections (EA Extended) and Yii2 Inspections plugins. These will all save you an enormous amount of time.
Link Getting a Host Craft 3 Install Setup
We’re not quite ready to start diving in an developing a plugin yet. First, we need to set up a Craft 3 install as a “host” where we will develop and debug our plugin.

We do this because we need a Craft 3 environment in which our plugin will run in order to be able to develop and debug it with any reasonable efficacy.
Just follow the Installation Instructions from the Craft 3 Documentation to get a new Craft install set up. As of this writing, Craft 3 is at beta 18, so the specific instructions may have changed somewhat, but it’ll be something like this:
composer create-project craftcms/craft /home/vagrant/sites/craft3 -s betaThen go grab a cup of coffee; it will use Composer to create a new Craft 3 project for you, and download all of the dependencies, which can take a while.
At this point you’ll need to set up your .env file as per the Installation Instructions, or use Craft3 Multi-Environment to set up your local dev environment.
Then you’ll need to finish the Installation Instructions to set up your database, web server, etc. which is all very specific to whatever local development environment you’re using, so we won’t get into that here.
Check out the A Craft CMS Plugin Local Development Environment article for details on how to set up a local development environment for plugin development.
If you’re using Homestead, this just involves editing your Homestead.yaml file to add the new site:
sites:
    - map: craft3.dev
      to: /home/vagrant/sites/craft3/web

databases:
- craft3And then do homestead reload --provision and away you go.
If you are using Homestead, and decide to use PhpStorm (please, do it!) this would be a very good time to check out the Using PhpStorm with Vagrant / Homestead article for how to get that set up as smooth as butter.
Link Can I write some code yet?
Phew, that was a lot of setup and we haven’t even written a single line of code. Well, welcome to modern development. If you’re doing it for the first time, setting up your tooling is going to take a bit of time, and there are a lot of pieces to get working together.
However, it will make things easier in the end, and remember, you only need to do this setup once.
So yeah, let’s write some code.
Whether you are writing a new plugin or porting a Craft 2.x plugin to Craft 3, the workflow that I suggest you use is this:
- Generate your plugin’s scaffolding at pluginfactory.io
- Fill in the skeleton scaffolding with the code that makes your plugin unique
- If you find you need an additional component, add it ad-hoc by using a locally installed generator-craftplugin
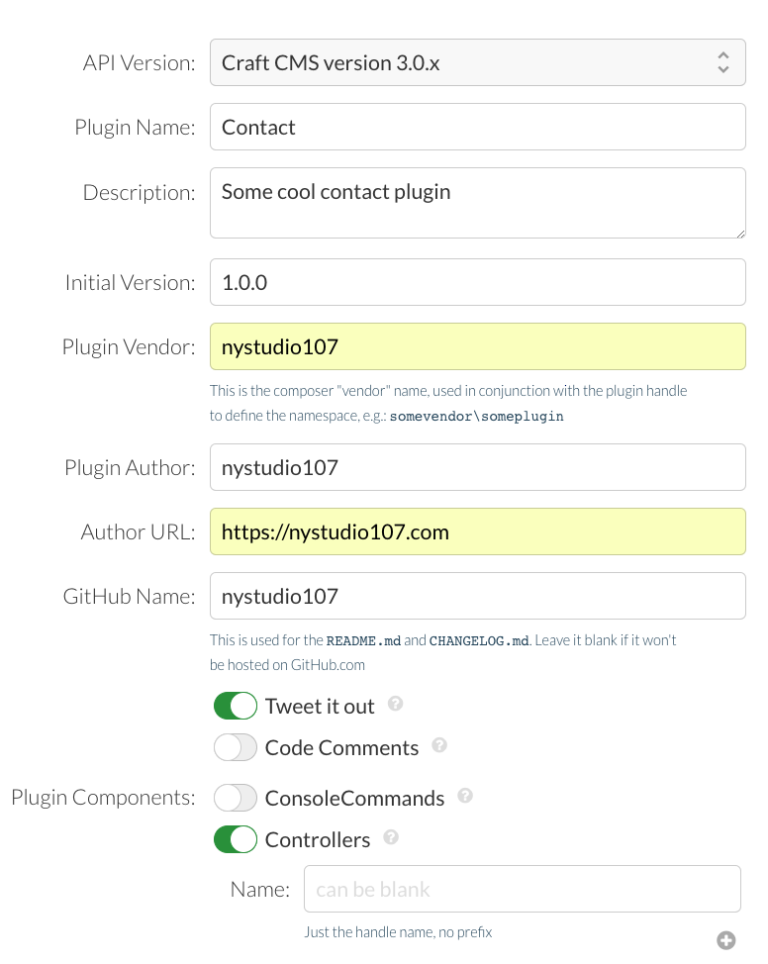
Make sure you select Craft CMS Version 3.0.x for the API Version. So here’s what this might look like:

Using pluginfactory.io to generate a Craft 3 plugin scaffolding
We’re just creating a plugin with a single Controller component. Click on Build My Plugin and it will download a .zip file with your plugin scaffolding created for you. Decompress it, and move it to somewhere that you keep your development work (this must be somewhere that is accessible by your VM as well, just like your websites).
Since Craft now relies heavily on Composer, we need to add our new plugin as a composer dependency. We do this by editing the composer.json file that was created when we had Composer create a Craft 3 project for us. Mine looks like this right now:
{
  "name": "craftcms/craft",
  "description": "Craft CMS",
  "keywords": [
    "craft",
    "cms",
    "craftcms",
    "project"
  ],
  "license": "MIT",
  "homepage": "https://craftcms.com/",
  "type": "project",
  "support": {
    "email": "support@craftcms.com",
    "issues": "https://github.com/craftcms/cms/issues",
    "forum": "https://craftcms.stackexchange.com/",
    "source": "https://github.com/craftcms/cms",
    "docs": "https://craftcms.com/docs",
    "rss": "https://craftcms.com/changelog.rss"
  },
  "minimum-stability": "beta",
  "require": {
    "php": ">=7.0.0",
    "craftcms/cms": "^3.0.0-beta.10",
    "craftcms/plugin-installer": "^1.0.0",
    "vlucas/phpdotenv": "^2.4.0"
  },
  "scripts": {
    "post-root-package-install": [
      "php -r \"file_exists('.env') || copy('.env.example', '.env');\""
    ]
  },
  "repositories": [
    {
      "type": "composer",
      "url": "https://asset-packagist.org"
    }
  ]
}First, we need to tell Composer that we require our plugin as part of the Craft 3 project by adding it in here:
"require": {
    "php": ">=7.0.0",
    "craftcms/cms": "^3.0.0-beta.10",
    "craftcms/plugin-installer": "^1.0.0",
    "vlucas/phpdotenv": "^2.4.0",
    "roave/security-advisories": "dev-master",
    "nystudio107/contact": "^1.0.0"
},Normally we’d now do a composer update which would cause it to look for the package nystudio107/contact and install it as part of our project. This is how we’d do it for any packages that are publicly available via Packagist, but we’re developing this plugin locally.
So instead, we can tell Composer to look in a local path for repositories as well:
"repositories": [
    {
      "type": "path",
      "url": "../../webdev/craft/contact/"
    }
]The path ../../webdev/craft/contact/ is just where my plugin lives on my local file system, relative to the current Craft project. If you’ll be working on a number of plugins, you can use a wildcard * to tell it to look at all sub-directories in our folder, so we can put all of our development plugins there:
"repositories": [
    {
        "type": "path",
        "url": "../../webdev/craft/*",
        "options": {
            "symlink": true
        }
    }
]
Okay great, now we can just do composer update and it’ll work its magic to create the autoloader for our newly added plugin:
vagrant@homestead:~/sites/craft3$ composer update
Loading composer repositories with package information
Updating dependencies (including require-dev)
Package operations: 1 install, 0 updates, 0 removals
  - Installing nystudio107/contact (1.0.0): Symlinking from ../../webdev/craft/contact
Writing lock file
Generating autoload files
You may also want to add the following to your composer.json file:
"config": {
    "optimize-autoloader": true
  },
This will cause Composer to optimize the autoload class maps after any composer install or composer update. It’s something that The P&T folks said they are going to add to the default composer create-project craftcms/craft project, but until it’s they do, it can’t hurt to do it manually.
vagrant@homestead:~/sites/craft3$ composer update
Loading composer repositories with package information
Updating dependencies (including require-dev)
Nothing to install or update
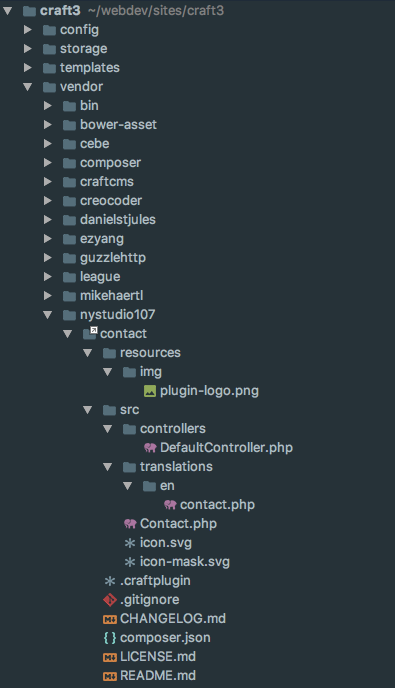
Generating optimized autoload filesFinally we can do some coding! A symlink to our plugin is now in vendor/nystudio107/contact and we can just work on this plugin using whatever editor or IDE you prefer, using our host Craft 3 website to test & debug it:

The Contact Craft 3 plugin as a Composer dependency
If you realize later on that you really need another Controller, we can leverage generator-craftplugin to add components ad-hoc. You’ll need to have Node installed, and then:
- Install Yeoman globally via sudo npm install -g yo
- Install the generator-craftplugin globally via sudo npm -g install generator-craftplugin
Then from inside of your plugin’s root directory (the one that contains the .craftplugin file) you can do things like: yo craftplugin --controllerName="woofer" to create a new Controller named “woofer” or yo craftplugin --consolecommandName="woofer" --pluginComponents="consolecommands" to add an entirely new Console Command plugin component named “woofer”.
There’s more information on how this all works, as well as a video showing it off in the Adding to an existing plugin section of the generator-craftplugin documentation.
Link Hey, wait a minute, you didn’t write any code!
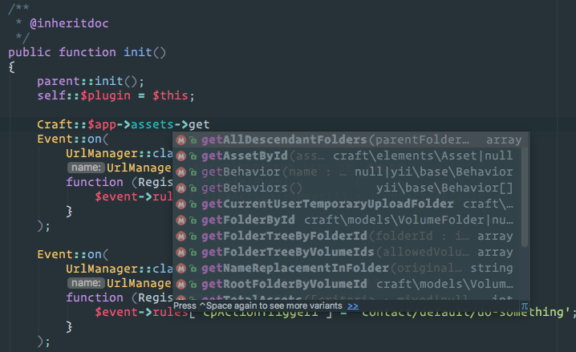
I told you I wasn’t going to show you how to write a specific plugin, but rather show you the process and methodologies that’ll make your life easier. Using PhpStorm will be a monstrous win when you’re trying to learn the Craft 3 plugin API, because of things like this:

PhpStorm code inspections
Beyond that, I look to 4 places when trying to learn how to write a specific Craft plugin:
- The official Craft 3 Plugin Development documentation
- Existing Craft 3 Plugins to see how other people did it
- By looking at the Craft 3 source code itself (it’s actually very well documented)
- The Yii2 Documentation, since much of the Craft 3 API is now a thin layer on top of Yii2
And when all else fails, often asking a question in #craft3 or #plugindev on the Craft CMS Slack will get you some good answers.
Also extremely useful for understanding Composer/Packagist semver naming is the Packagist Semver Checker.
If you’re moving from Craft 2.x to Craft 3.x plugin development, you’ll find that a lot of the Craft-specific plugin layer has been removed, and the APIs and methodologies lean heavily on Yii2. Which is a great thing, since you’re learning a skill that has broader implications, and since there’s good documentation available.
It may seem overwhelming at first, but spending a bit of time learning about how Yii2 thinks about the world is very well-spent, because then you realize you can start leveraging all of the nicities that Yii2 offers… and you end up writing less code.

You’ll also find that most of the methods you’re used to still exist, they’ve just been moved around a bit. It’s sort of like someone has come in and re-arranged the furniture in your house.
While this may be irksome at first, the refactoring of the Craft 3 APIs is a huge win long-term. Everything makes more logical sense, and conforms to many Yii2-isms.
Good luck, and happy coding!


